
It has been years since I have updated this blog. Multiple times over the years I have started to write new posts, but realize part-way through that some of the information is obsolete or I have discovered a better way, so I never end up publishing. Now that AI is on the cusp of taking over many different industries, I may need to pivot my skillset shortly. I need to document more of what I do so that I can better communicate my capabilities across some of the tools available to architects and engineers. This post will summarize the path that has led me to develop design automation tools for Autodesk Revit and the Construction Cloud, and beyond.
The Journey
Here is a simplified table of the software tools that I have used in the past several years of my professional life:
| Year | Location | Software Tools | Description |
| 2014 | West Des Moines | AutoCAD 2014, Bluebeam | CAD Drafting for Single-Family Homes |
| 2015 | West Des Moines | AutoCAD 2014, Rhino3D, Grasshopper, GHPython | Freelance design, space-planning research |
| 2016 | West Des Moines, New York City | Rhino3D, Grasshopper, GHPython | Freelance design, space-planning research |
| 2017 | New York City | AutoCAD 2010, Acrobat | Junior Architect |
| 2018 | New York City | AutoCAD 2017, Drawboard | Junior Architect |
| 2019 | New York City | AutoCAD 2017, Drawboard | Junior Architect |
| 2020 | New York City | AutoCAD 2016-2021, Revit 2016-2021, BIM 360, Rhino3D, Grasshopper, Rhino.Inside.Revit, Bluebeam | AEC Application Specialist providing technical and implementation support |
| 2021 | New York City | AutoCAD 2017-2022, Revit 2016-2022, BIM 360, Rhino3D, Grasshopper, Rhino.Inside.Revit, Python, Bluebeam | AEC Application Specialist providing technical and implementation support |
| 2022 | New York City | AutoCAD 2018-2023, Revit 2016-2023, BIM 360, ACC Autodesk Build, Rhino3D, Grasshopper, Rhino.Inside.Revit, Python, VB.NET | AEC Application Specialist providing technical and implementation support |
| 2023 | New York City | AutoCAD 2019-2024, Revit 2016-2024, BIM 360, ACC, Autodesk Build, Rhino3D, Grasshopper, Rhino.Inside.Revit, Python, HTML, CSS, Javascript, VB.NET, C#, SQL | Freelance design, Computational Design, Implementation support, Software development |
| 2024 | New York City | AutoCAD 2023+, Revit 2023+, BIM 360, ACC, Rhino3D, Grasshopper, RiR, Python, HTML, CSS, Javascript, C#, SQL, C++ | Freelance design, Computational Design, Implementation support, Software development |
My understanding of parametric design has undergone substantial growth through my engagement with Building Information Modeling (BIM) workflows. Early on, while using AutoCAD, Rhino, and Grasshopper, the advantages of parametricism were evident, but managing the models became challenging as complexity increased. With Revit, it was a step forward for parameter management. My exposure to Revit’s capabilities via the Revit API developed from using this sequence of tools:
Learning by building
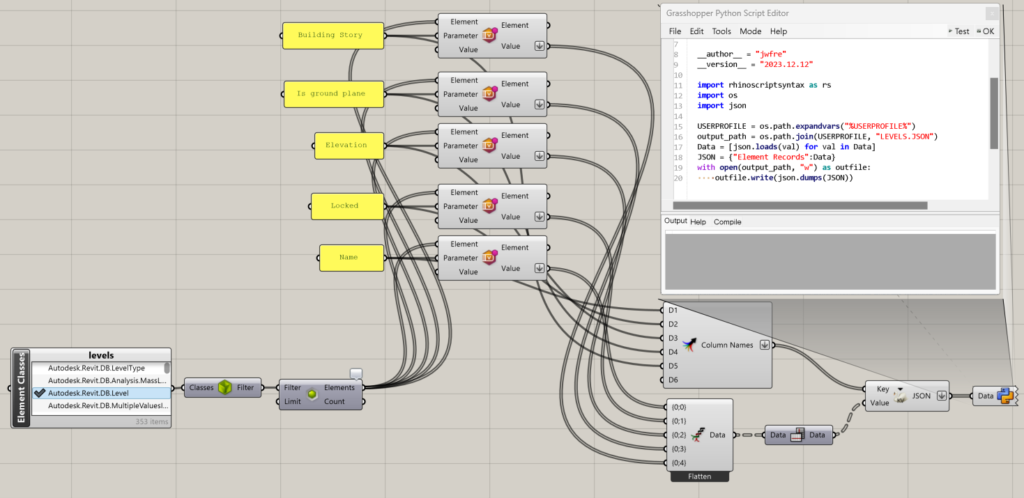
I started to learn about the Revit API by building a Model Health Check Add-in, which is essentially a set of exporters that collect data on elements in a model and save the data to CSV or JSON. The data is then analyzed and used to generate a report. Through building this application, I became familiar with the classes, properties, and methods available from the API. Most of the first exporters I built were with Grasshopper using a combination of Rhino.Inside.Revit components, Grasshopper components, and custom GHPython components. These tools allowed me to build a prototype Revit Add-in with Grasshopper. Here is an example Grasshopper definition that exports some data about Levels in a Model, along with an example output file. (Note: if the links are expired, please let me know and I will relink)
Example Files
REST APIs
When an opportunity arose to develop an app that could work with the Autodesk BIM 360 API (Autodesk Platform Services, formerly Forge), I also turned to Grasshopper because Hops can communicate with a local Flask server, where I could thereby make web callouts. I also explored using Postman, due to the large prebuilt collections available, but the final product needed to be relatively intuitive and clean. This led to building a Toolbar for Rhino using the Grasshopper Player. Each button in the toolbar automated certain tasks in Autodesk BIM 360. These were tasks that could have taken a large amount of time, with some listed below:
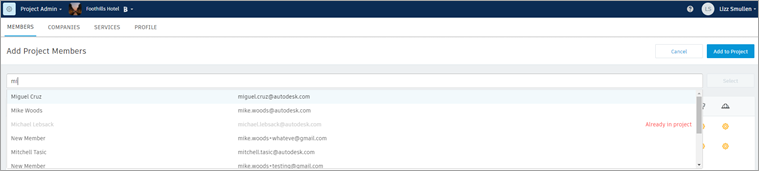
- Adding Multiple Users to Multiple Projects
- Adding Users to Projects in BIM 360 requires navigating to the Project and typing in the users one by one. There are some workflows that people have developed using AutoIt, but it is still limited to one project at a time.
- Adding Folder Permissions by Role
- Permissions allow for access to files and folders to be tightly controlled. However, when there are many projects, many roles, and many folders, it can be cumbersome to ensure all projects have the same permissions with the built-in tools. Project Templates can help to reduce the workload, but they only help when creating a new project – if a new folder with new permissions needs to be added, it may need to be done across multiple projects that share the same workflows.
- Synchronizing a User’s Project Role and Company with their Default Role & Company
- Role-based permissions allow for high-level document management. When a user’s role needs to change, or if they had been mistakenly assigned a role they shouldn’t have, it is helpful to synchronize with the defaults across all of the projects they are already members of.
Changing to a web-based framework
Grasshopper is great for prototyping tools or as a Rhino design tool, but if I were to build the same app today, I would not use Grasshopper as the framework. I built the Add-in with Grasshopper because it was the path that made the most sense from my existing knowledge of design software and scripting. Grasshopper is a powerful tool, but due to compatibility issues between different versions of Grasshopper, Rhino.Inside.Revit, or Hops, I have found that it takes too much effort to manage and update, and is prone to crashing or just not running successfully across different devices. Although not an ideal approach, the Rhino toolbar app introduced me to the world of building a Flask server with Python, which took things to another level in app development.
A Flask server can send and receive requests, which makes it a suitable platform for building a web application. Python has its shortcomings, but it is a powerful tool with a great set of open-source packages. I may end up regretting it, like my attempt to build apps with Grasshopper, but I decided to develop a web app with Python because I have familiarity with GHPython and Python 3. I have coding shortcomings as well, but with more experience, it should get better.
Learn more by building more
A web app can be broken down into (3) main layers:
- UI – User Interface for the end user to get and provide information
- Data – Storage of files in a file system and/or data in a database
- Logic – The back-end processes that run the bulk of the code
In addition to Python, a necessity for building a Flask web app, at the most basic level, is HTML. Luckily, I had some experience with HTML having built a few simple, static websites in the past. However, I had used Adobe Dreamweaver (😂) previously, so I never needed to know how HTML worked at an advanced level. As I worked with HTML, the use of CSS was necessary to style the content. As I desired to make more responsive web pages that could load content on demand from user input, Javascript became necessary. Javascript also helps to offload some of the processing onto the end user’s machine, so that the back-end is not as overloaded. This is particularly necessary when the number of users increases, and the number of concurrent requests can potentially overload the back end.
Once I had much of the app’s framework in place, I wanted to test it out in a Production environment, so I set up a dyno on Heroku to host the app and added a PostgreSQL database to securely store data. Slowly but surely, with the use of Python, HTML, CSS, SQL, and Javascript, the capabilities of the web app expanded.
Here is how the coding languages are broken down by their function in the web app:
- Python – Logic, Data
- Most of the heavy lifting
- Runs scheduled tasks
- Access files on the file system
- HTML – UI
- Inputs
- Buttons
- Links
- CSS – UI
- Styling of the HTML elements
- SQL – Data
- Access the PostgreSQL Database
- Javascript – Logic, UI
- For dynamic pages, Javascript can call endpoints from the Python backend
With a new framework in place, I started to build new tools for User Management, similar to those built with Grasshopper, but with a more interactive and intuitive User Interface (real-time filtering, selections, and results). I experimented with other packages and APIs unrelated to Autodesk, such as the OpenAI API, allowing me to build a prompt engine that could get formatted responses from GPT-4. I also built a configurator for the Drake Equation, allowing a user to estimate the number of intelligent civilizations there could be in the Milky Way galaxy. I even built an app with the Spotify API that is based on a game my brother and his family invented, which is basically “name that tune” with extra steps. These side projects were for fun, but I always learned something valuable in the process. As I mentioned earlier, with more experience the coding should get better.
I also expanded beyond the BIM 360 API to other Autodesk APS APIs, like the Autodesk Construction Cloud API, Viewer API, Model Derivative API, and Design Automation API. The Revit tutorial for the Design Automation API got me up and running so that I can run AppBundle Activities with a Workitem.
Most tasks that can be scripted to run in Revit locally (without using any UI elements), can now run on Cloud models. The eliminates the need to spend time downloading the model(s), or manually opening the files one at a time with Revit. This opens up great potential for automating repetitive tasks and offloading processing onto Autodesk’s powerful data center computers.
To build the add-in (DLL) for Revit, I had to buckle down and finally learn more C#. I knew a little bit of C# before (I could understand most of it, but couldn’t code it), but writing a small Revit export tool in C# really helped me get a grasp of the language, and recognize the benefits in speed and efficiency of C# as opposed to Python.
Automating tasks on cloud models,
in the cloud.
However, there is a caveat to using Design Automation: it needs Flex Tokens to run. The good news is that it isn’t terrible in small quantities. One token, which is equivalent to ~$3, is charged for every hour that Design Automation runs. So if a Workitem takes (1) minute to run, it would cost 5 cents. Likewise, if the Workitem is scheduled to run daily, and would take on average (1) minute to run, it would cost $18.25 over a year. If scheduled weekly, it would cost $2.60 over a year. As a cost of maintaining a clean and accurate model for a project, it’s not too bad. As long as the app doesn’t run for long stretches, there is a lot of value that can be built into a light app.
Summary of existing features of BIM 360 / ACC Web App
I am working on the documentation for the app on Notion, which will serve to replace this rough outline.
- Add users to multiple projects (BIM 360 only)
- Search for users from the member directory
- Upload user list
- Match Projects – Invite user(s) to the same projects as another user
- Project 2 Project – Invite all users from one project to another project
- Set folder permissions across multiple projects
- By User
- By Role
- By Company
- Synchronize user defaults across all projects
- Role
- Company
- Batch change default company
- Synchronize Data Connector data with Database
- admin_users
- admin_projects
- admin_roles
- admin_companies
- Member information
- Projects they are a member
- Date added
- Dashboards
- Number of projects by state
- Count by last sign in
- Count of user roles
- Count of projects accessible to company
- WIPS
- Project > Folder navigation with Autodesk Viewer
- System for sharing access to a model viewer for a client
- Design Automation for Revit
- Export data
- Modify window parameters
Roadmap for development
- Visualize data from Revit model, exported from Design Automation/Model Derivative
- Health Check
- Get access to Validation Tool from the BIM Interoperability Tools
- System to schedule tasks to run periodically, asynchronously
- Inactivate users that have not signed-in after X-days
- Synchronize user defaults across projects
- Simplified interface for running Workitem
- System for scheduling Workitems to run on a reoccurring interval
- Get access to the Data Exchange API, and AEC Data Model, which is likely going to define the next generation of cloud-based BIM.
- More methods to call from the AppBundle
- More robust parameter editing for shared parameters
- More robust data export in Revit
- AutoCAD Design Automation AppBundle to export data for project
- Toolbars and buttons added in the UI for the Viewer
- Convert AutoCAD Architecture DWG to Revit model
- Export a minimal amount of data to standardized JSON format from DWG or RVT (or use data exchange)
- Define process for reading standardized JSON format or Data Exchange and build Revit model
- Mapping of AutoCAD styles to Revit Families where applicable